Preparation:
Before starting to install WordPress, you need a couple of things:
• A domain name and web hosting
• WordPress software
Before starting to install WordPress, you need a couple of things:
• A domain name and web hosting
• WordPress software
A domain name and web hosting:
The first step is choosing a domain name (for example www.mydomain.com) and web hosting. There are a lot of sorts ofweb hosting. In most cases the registration of the domain name is included with the web hosting. If you’re just starting withWordPress, then I advise you to go for cheap shared web hosting. At any time, you’ll be able to move your blog to another web host if you need more power. Examples of companies offering shared hosting are: Bluehost, Dreamhost and Hostgator.Of course, there are MUCH more web hosting companies, so feel free to choose your own.
The first step is choosing a domain name (for example www.mydomain.com) and web hosting. There are a lot of sorts ofweb hosting. In most cases the registration of the domain name is included with the web hosting. If you’re just starting withWordPress, then I advise you to go for cheap shared web hosting. At any time, you’ll be able to move your blog to another web host if you need more power. Examples of companies offering shared hosting are: Bluehost, Dreamhost and Hostgator.Of course, there are MUCH more web hosting companies, so feel free to choose your own.
If you’re building a professional blog or website for a lot of visitors that has to be fast, then I advise you to take a look atmanaged WordPress hosting like WPEngine, Page.Ly or ZippyKid.
For more information, reviews and speed tests of web hosting, please check my blog wpbrix.com/hosting/
WordPress software
You can download WordPress for free at www.wordpress.org.
Step by step installation
WordPress is famous for its “5 minutes installation” (sounds great, isn’t it?)
Step 1: Upload the WordPress software
After you downloaded WordPress and unpacked the zip file, you have to upload WordPress through FTP to your web hosting. Normally you don’t have to create an extra folder, unless you want WordPress to be installed in a subfolder.
Step 2: Start the installation
In your web browser, visit the url where you installed WordPress. In most cases this will be something like http://www.yourdomain.com.
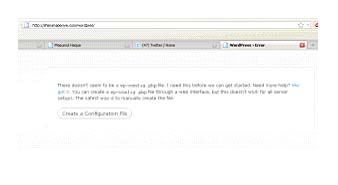
Step 3: Create a configuration file
In this screen you’ll see next message:
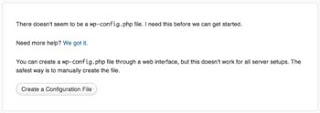
Click the “Create a Configuration File” button.
It’s possible that WordPress can’t create the configuration file. When you experience this problem, search for wp-configsample. php on your web space. Just make a copy of wp-config-sample.php and rename it to wp-config.php. Now try again.
It’s possible that WordPress can’t create the configuration file. When you experience this problem, search for wp-configsample. php on your web space. Just make a copy of wp-config-sample.php and rename it to wp-config.php. Now try again.
Step 4: Welcome message
The next screen is a welcome message. It also reminds you to the fact that you need all the information you got from your web host.

Step 5: Fill In The Database Connection Details
In the following screen you need to fill in the database connection details:
In the following screen you need to fill in the database connection details:

The following fields have to be filled in:
• Database Name: the name of your database
• User name: the MySQL username
• Password: the MySQL password
• Database Host: by default this is localhost (only change this if you have anoter database server from your web host)
• Table Prefix: by default this is “wp_” but for security reasons it’s better to fill in another table prefix.
Click the “Submit”-button to proceed.
If you see this screen, your database connection details are ok:

Click the “Run the install” button to start the installation of WordPress
Step 6: fill in the basic information
In the following screen you have to fill in some basic information

• Site title: fill in the title of your blog or website.
• Username: choose a username. By default “admin” is filled in but for security reasons I advise you to choose another
username. This makes it harder for hackers to guess your administrator username.
• Password, twice: fill in a password. For security reasons, pick a strong password that’s not easy to guess!!
• Your E-mail: fill in a valid e-mail.
• Allow my site to appear in search engines like Google and Technorati: select this so your website can be found and
indexed by search engines.
Click the “Install WordPress” button after you filled in the needed information.
Step 7: installation completed

That’s it!
Click the “Log In” button to get access to the back office where you can manage WordPress.
Click the “Log In” button to get access to the back office where you can manage WordPress.
Web host with a pre-installed version of WordPress:
As you can see, installing WordPress is very easy. But there are some companies offering web hosting with a WordPress 1-click-installation. This makes it even easier to install WordPress!
Another option is managed WordPress hosting. In this case, WordPress will already be installed, together with a selection of plugins. Examples of companies offering managed WordPress hosting are WPEngine, Page.Ly and ZippyKid.
More information
Check out the WordPress Codex for more information about the installation of WordPress: codex.wordpress.org
If you have a question or if you need help, check out the Offictial WordPress forum: wordpress.org/support/